Conference Manager Guide
Manage registration types, topics, registrations, submissions, and attendance from your conference dashboard
1 Opening Your Conference Dashboard
Every management task happens inside a conference's dashboard:
- Click Organize a Conference in the main navigation
- Find the conference you manage in the list
- Click Go to Dashboard
- Use the left sidebar to move between management sections
The full management menu (Settings, Registration, Submission, Invoice, and more) appears in the sidebar only after an administrator approves your conference. Before approval you can still edit the conference and view billing.
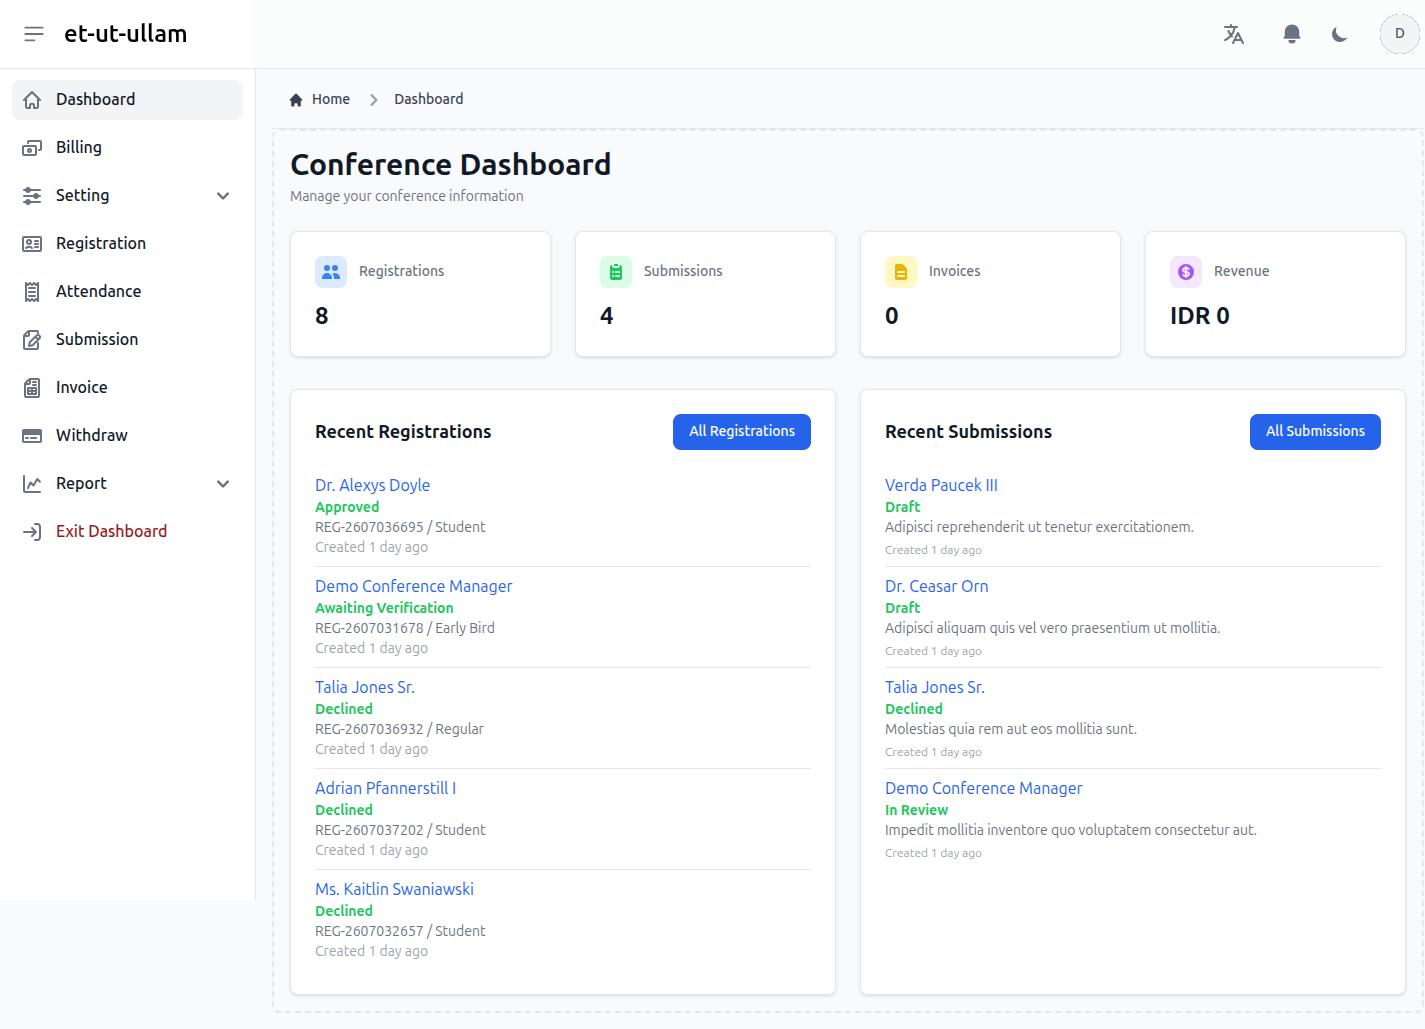
Screenshot: Conference dashboard with registration, submission, invoice, and revenue overview
2 Managing Registration Types
Registration types define the tickets participants can buy (for example Early Bird, Student, or Regular). Open Settings → Registration Type in the sidebar:
- Click Add Registration Type to create a new ticket
- Set the name, price, and the start, end, and payment deadline dates
- Toggle whether it is published, requires a paper submission, and shows its price publicly
- Use Update to edit or Delete to remove a type
- Use the search box and filters to find a specific type
The date windows control when each type is open for registration and payment, so you can offer early-bird pricing that closes before regular registration.
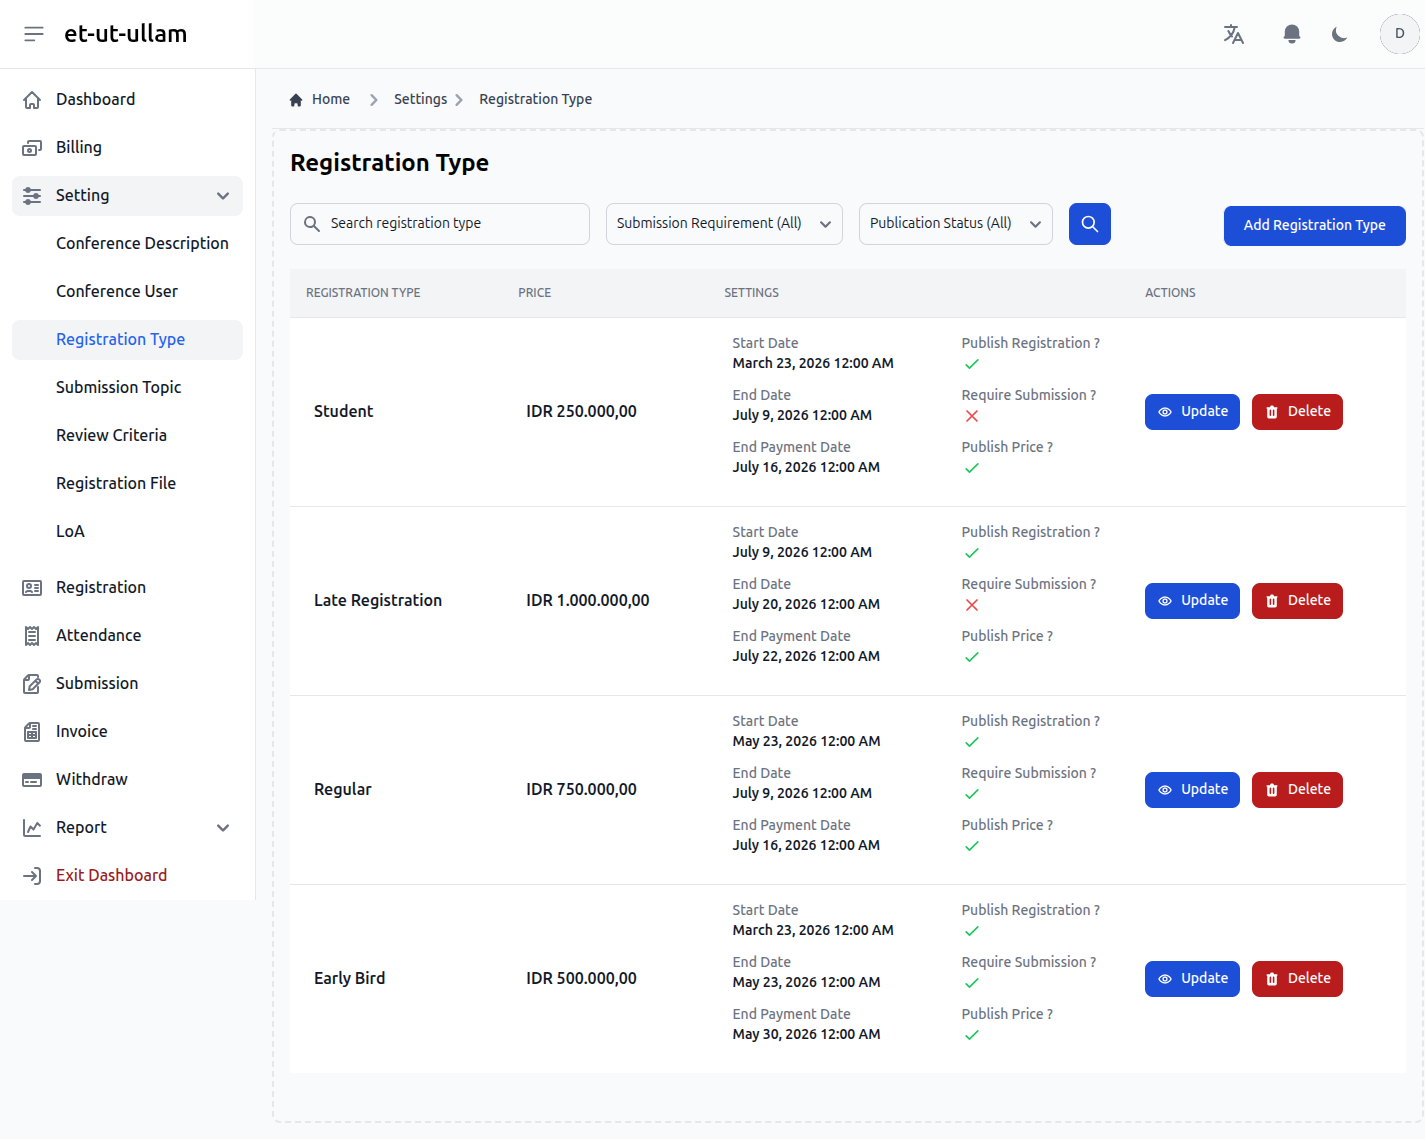
Screenshot: Registration types with prices, date windows, and settings
3 Managing Submission Topics
Topics are the research tracks authors pick when they submit a paper. Open Settings → Submission Topic in the sidebar:
- Click Create New Topic to add a track
- Give it a clear name (for example "Artificial Intelligence")
- Mark it active so authors can choose it
- Use Update or Delete to maintain the list
Only active topics appear in the author's submission form. Deactivate a topic instead of deleting it if papers are already assigned to it.
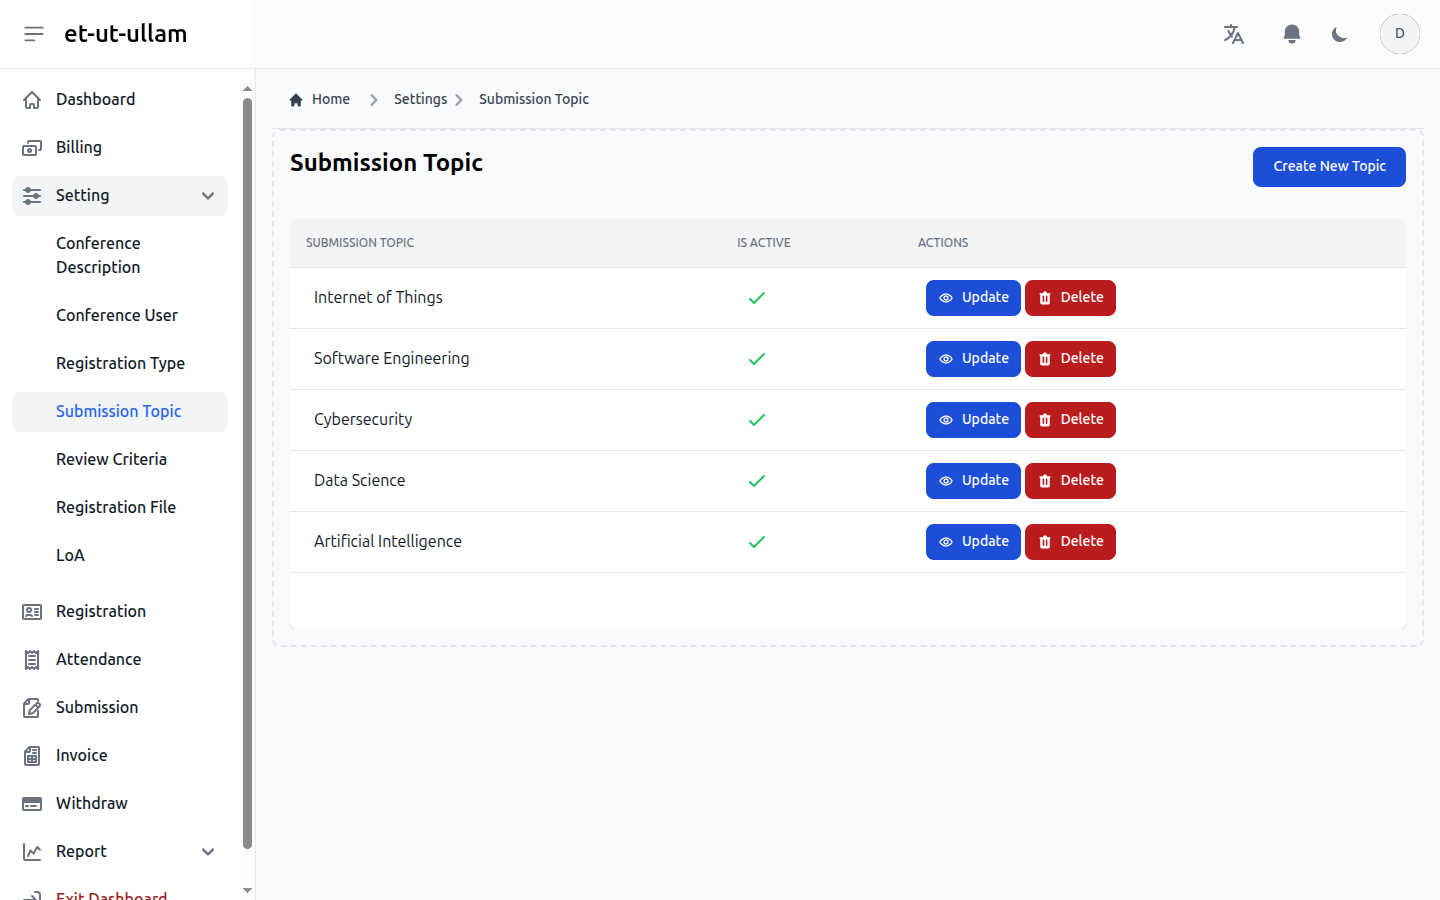
Screenshot: Submission topics with active status and actions
4 Managing Registrations
Open Registration in the sidebar to review everyone who signed up for your conference:
- Search by participant and filter by status
- Click Detail to open a registration, review uploaded files, and verify it
- Change the status as the registration progresses
- Export the list to Excel and download all registration files in bulk
Registrations move through these statuses:
- Draft The participant started but has not requested verification yet.
- Awaiting Verification The participant asked you to review and verify their registration.
- Approved You confirmed the registration is valid.
- Declined The registration was rejected.
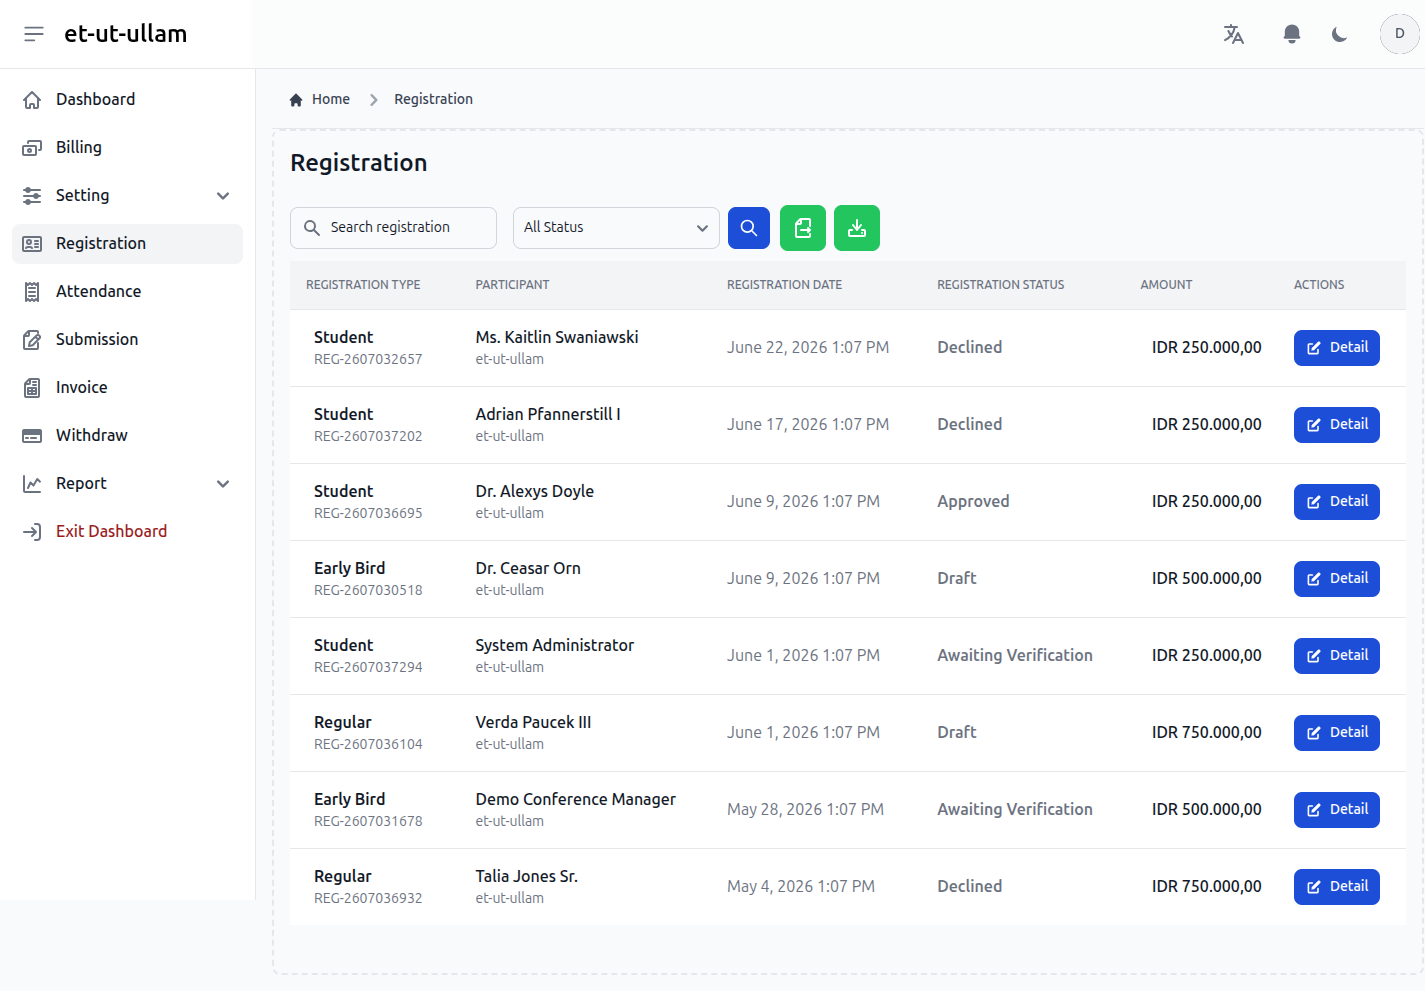
Screenshot: Registration list with participants, statuses, and export tools
5 Managing Submissions
Open Submission in the sidebar to handle the papers submitted to your conference:
- Search by title and filter by status or topic
- Click Detail to open a paper, assign reviewers, and read their scores
- Record the final decision: accept, decline, or request a revision
- Export the submission list to Excel
Submissions move through these statuses:
- Draft The author is still preparing the paper.
- In Review Assigned to reviewers and being evaluated.
- Revision Required You asked the author to revise and resubmit.
- Accepted The paper was accepted for the conference.
- Declined The paper was not accepted.
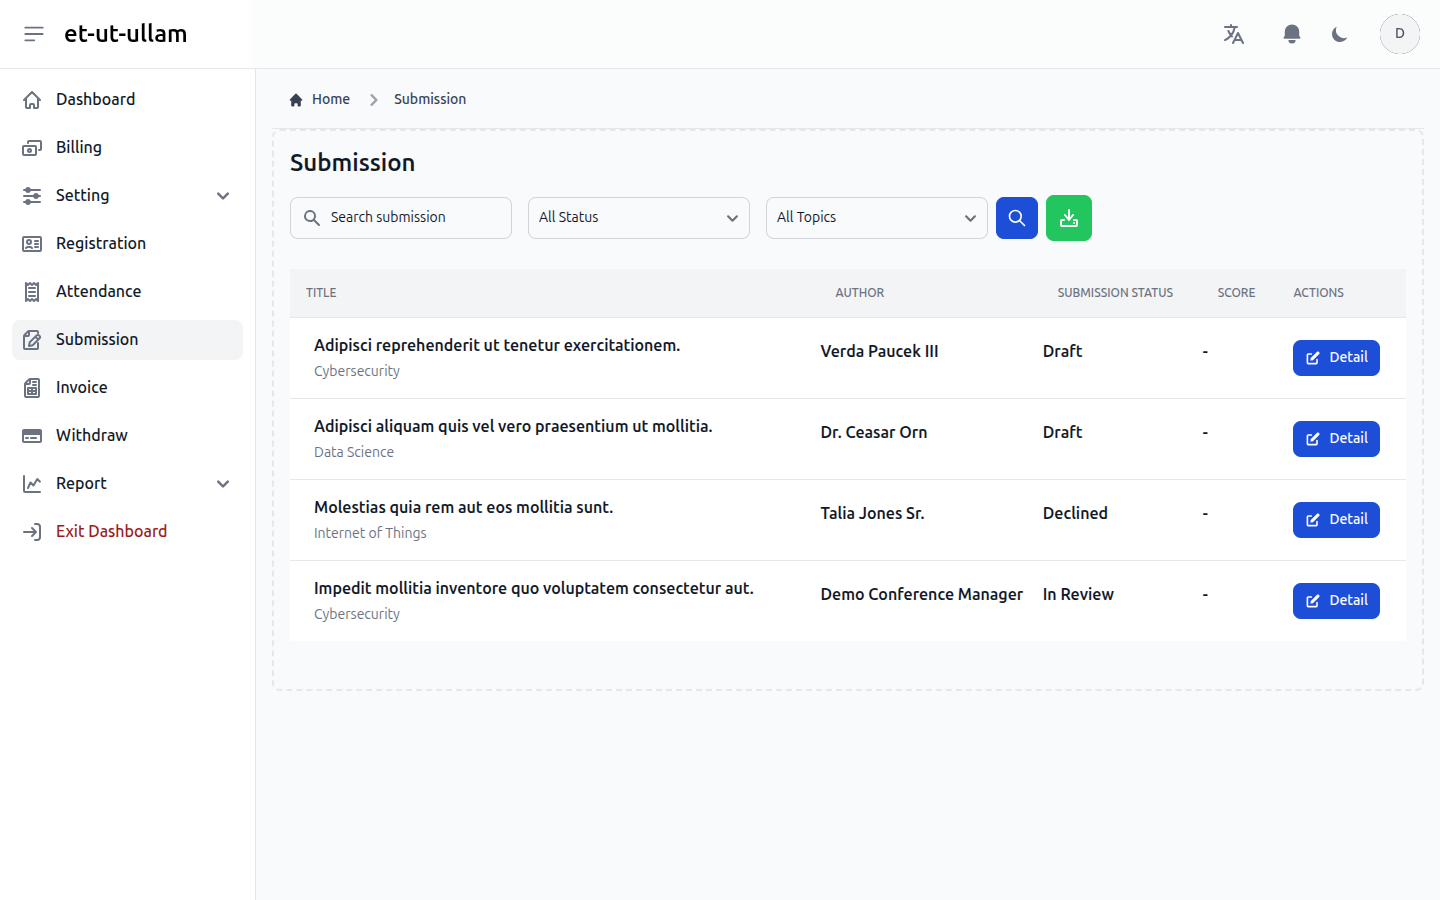
Screenshot: Submission list with authors, statuses, scores, and filters
6 Reviewing Submissions
Peer review is managed from a submission's detail page. Open Submission in the sidebar, then click Detail on the paper you want to review.
Start the review
Reviewers can only be assigned once the submission is In Review. In the Review Results section, set the Submission Status to In Review to begin.
Assign a reviewer
In the Reviewer Assignments section, click Assign Reviewer and fill in the form:
- Reviewer Type — invite an External reviewer by name and email, or choose an Existing user already registered as a reviewer for the conference
- Due Date — when you would like the review completed
- Review Mode — Double Anonymous (identities hidden both ways), Anonymous (reviewer sees the author), or Open (both disclosed)
- Share review result with the author — keeps the reviewer anonymous but lets the author read the review
- Internal Note — optional note kept private to the organizing team
An invitation email with a private review link is sent to the reviewer automatically. You can assign several reviewers to the same submission.
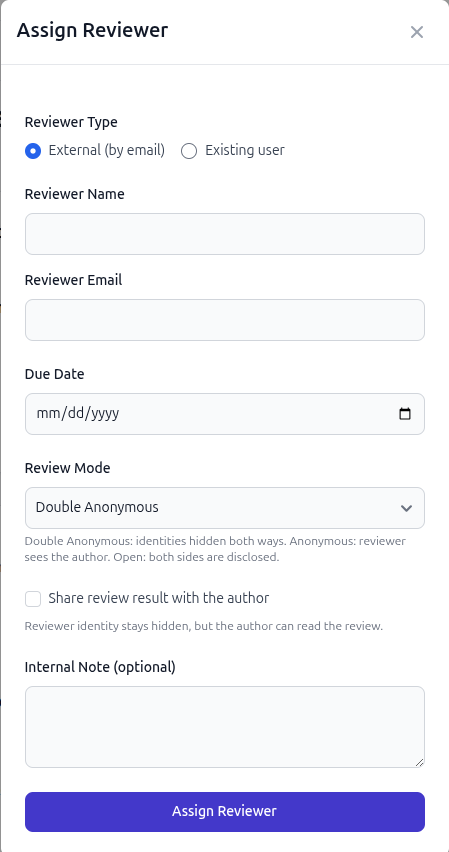
Screenshot: Assign Reviewer form with reviewer type, due date, and review mode
Track reviewers and read their feedback
Each assigned reviewer appears in the list with their status and, once done, their recommendation and comments. From here you can also:
- Resend the invitation email if a reviewer misplaced the link
- Edit the due date, review mode, or internal note
- Remove an assignment that is no longer needed
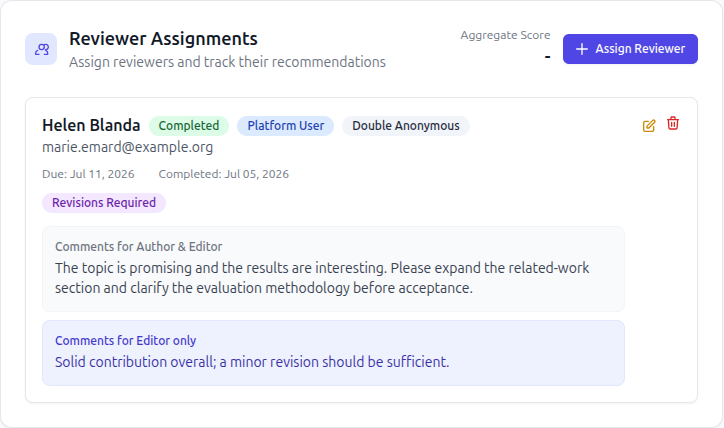
Screenshot: A completed review showing the recommendation and reviewer comments
Record your decision
When you have enough reviews, use the Submission Manager Decision panel to set the final Submission Status (Accepted, Declined, or Revision Required), add optional notes, and click Submit Decision. The author is notified of the outcome.
If you configured review criteria for the conference, reviewers' criteria scores also appear in the Review Results section to support your decision.
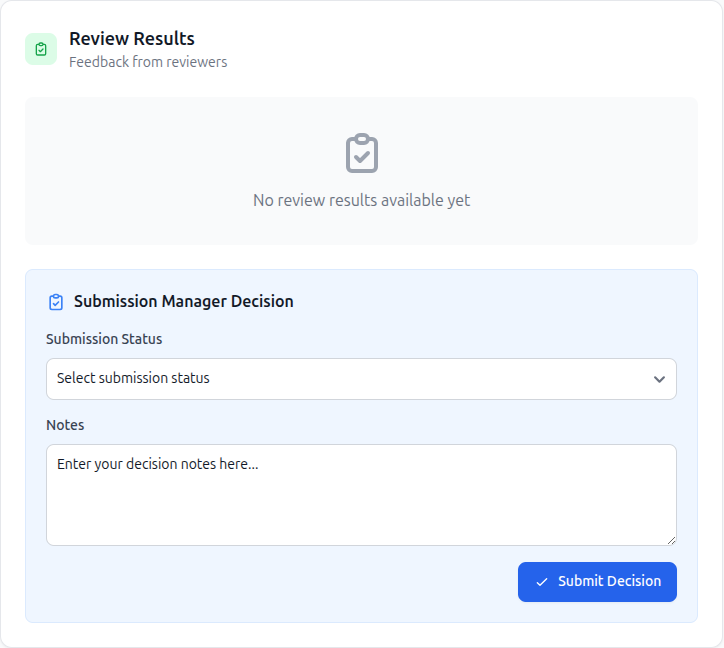
Screenshot: Review Results and the Submission Manager Decision form
7 Tracking Attendance
Open Attendance in the sidebar to create sessions and track who checked in. Each session represents one block of your event you want participants to attend (for example a keynote, a parallel session, or a workshop).
Create an attendance session
Click Add Attendance Session and fill in the form:
- Session Name — a short, recognisable label (for example “Day 1 — Opening Keynote”)
- Description — optional note shown to participants
- Open for Attendance — toggle whether participants can check in right now
- Opens At / Closes At — optional schedule window. Leave both empty if you prefer to control access manually with the toggle
A session is only effectively open when the toggle is on and the current time is within the schedule window (if you set one). Participants who try to check in outside the window see a “Closed” status.
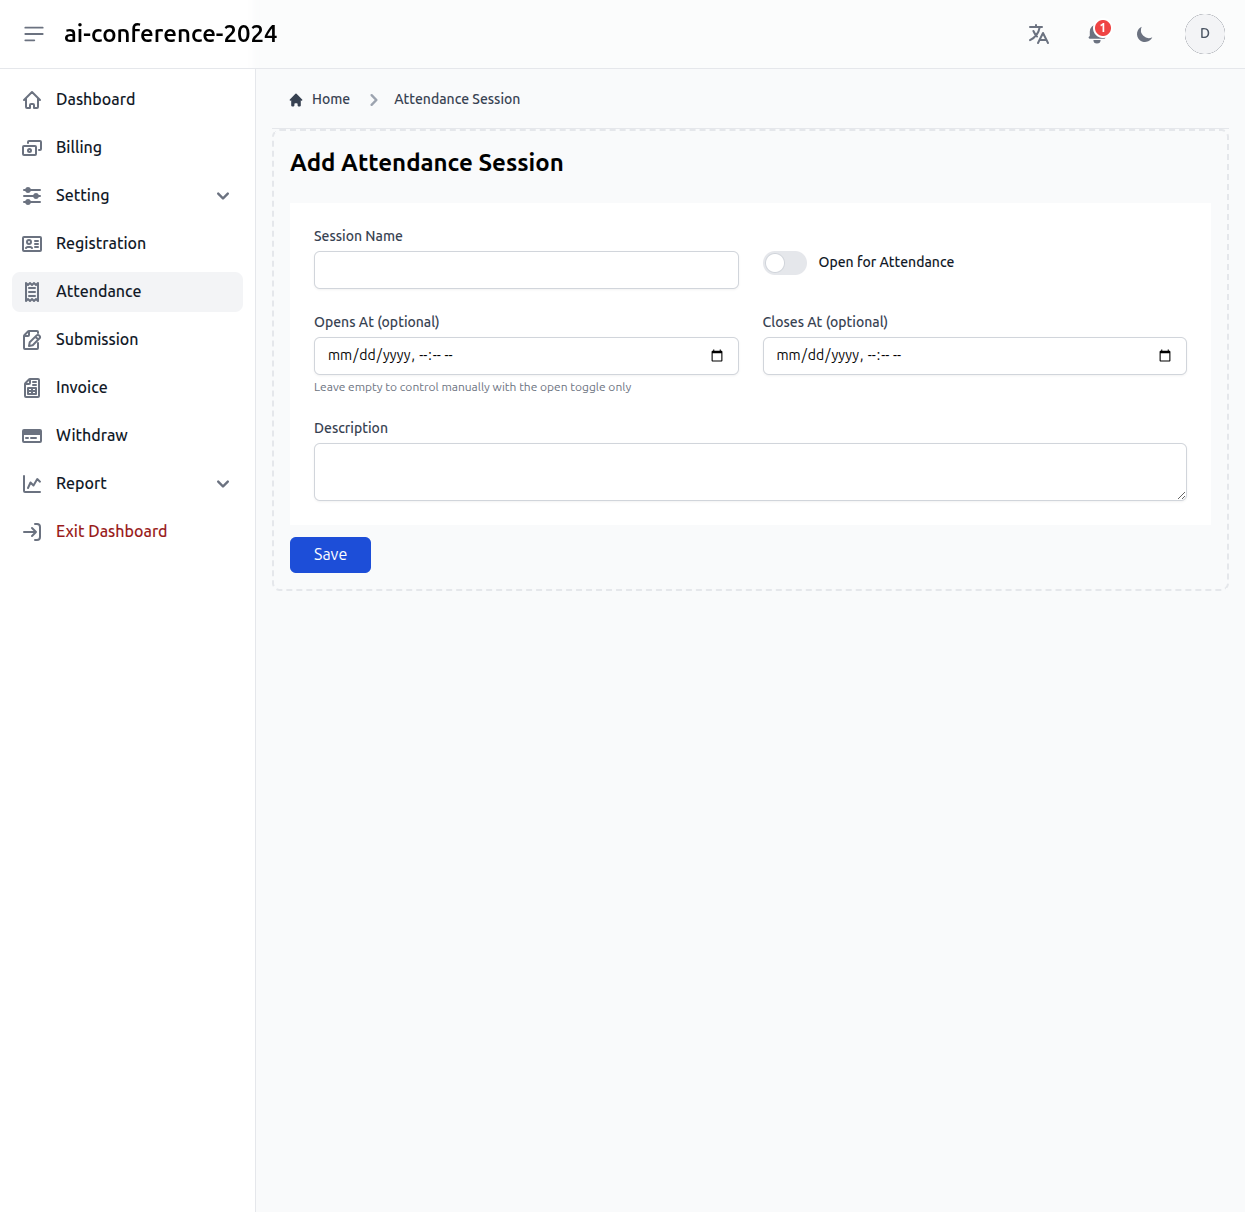
Screenshot: Add Attendance Session form with name, description, toggle, and schedule
Open and close a session
On the attendance session list each row shows the schedule, current status, and a live attendee count. Use the buttons on the right to manage each session:
- Open / Close — flip the toggle without editing the session
- Recap — see who attended and export the list
- Participants — restrict the session to a subset of verified participants
- Update — edit the name, description, toggle, or schedule
- Delete — remove a session that has no attendance records yet
Each session shows one of these statuses:
- Open Toggle is on and the current time is within the schedule window. Participants can check in.
- Outside Schedule Toggle is on but the current time is outside the opens/closes window.
- Closed Toggle is off. No check-ins are accepted.
- Restricted Only participants you selected on the Participants page can check in.
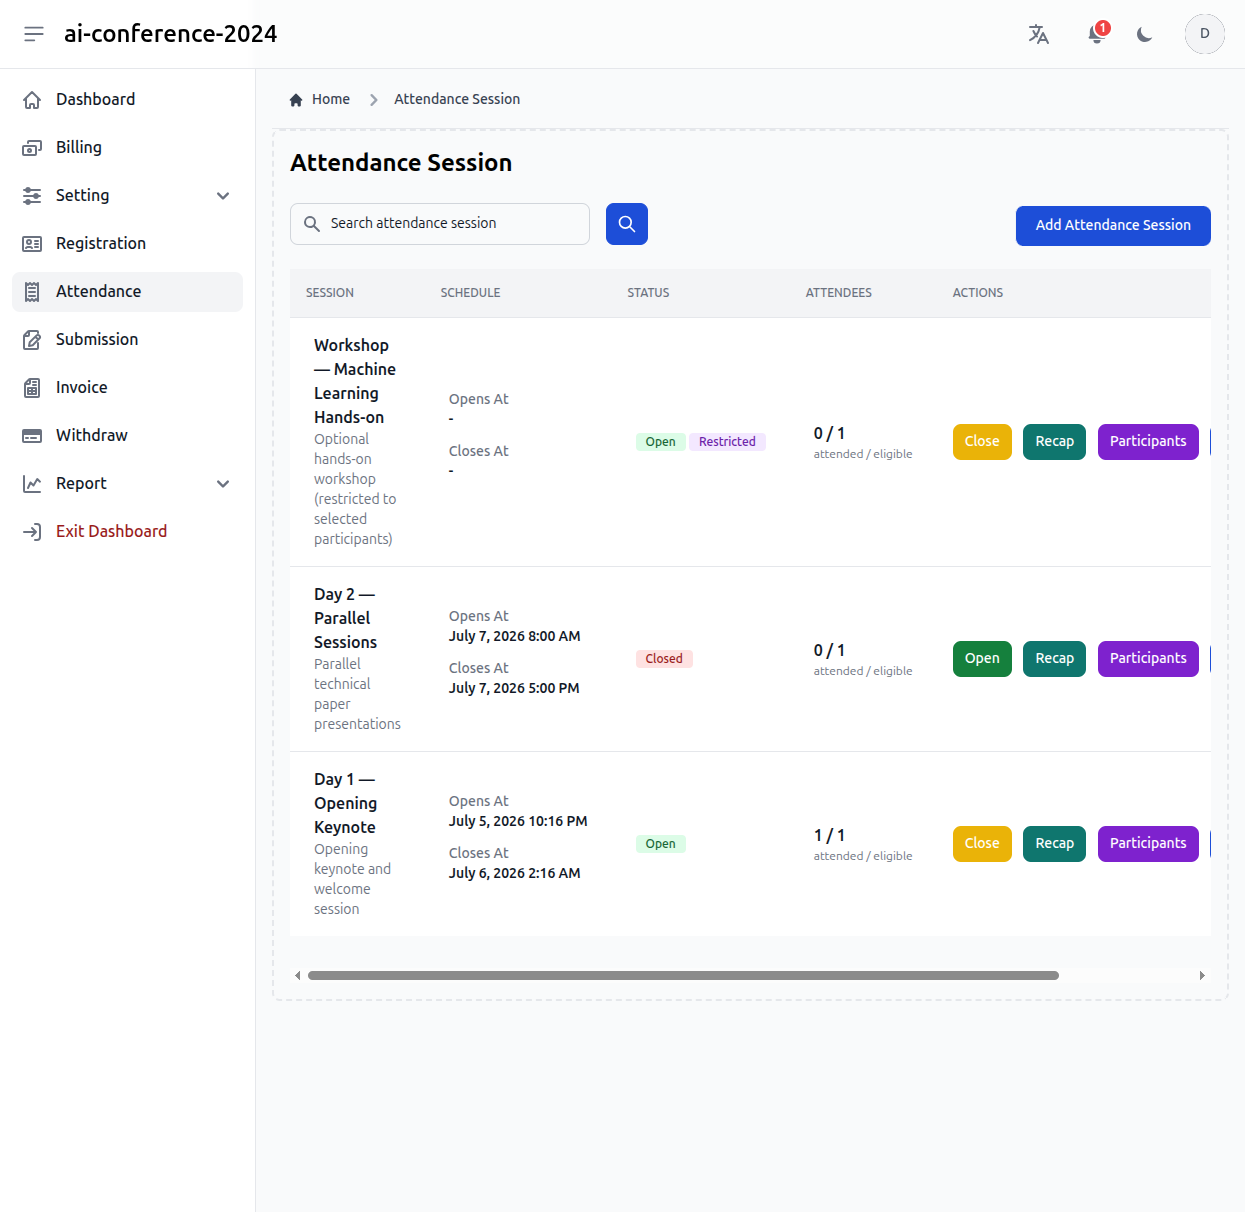
Screenshot: Attendance session list with schedule, status badges, attendee counts, and actions
Restrict a session to selected participants
By default every verified participant can check in. To limit a session (for example a workshop or a committee meeting), click Participants, enable Restriction, then tick the verified participants who are allowed.
Only participants with a verified registration are listed. Turn restriction off again to reopen the session to all verified participants.
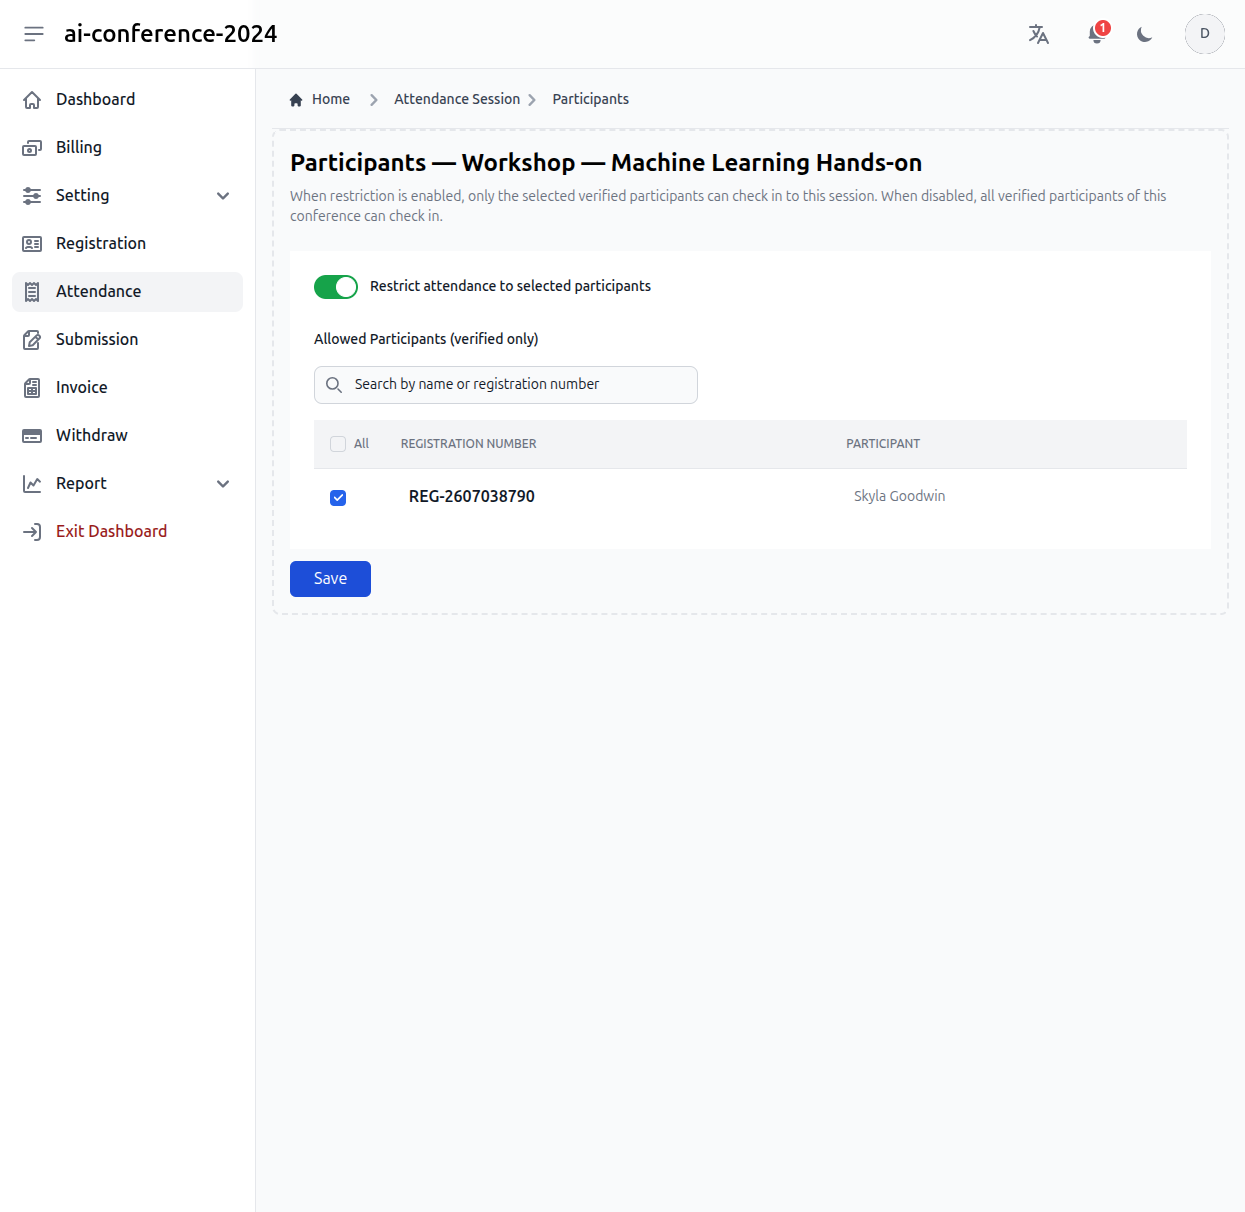
Screenshot: Participants page with restriction toggle and verified participant checkboxes
Review the recap and export
Click Recap on a session to see the attendance rate and a per-participant breakdown (Present or Absent, with the check-in time). Use Export Excel to download the same data as a spreadsheet for your records.
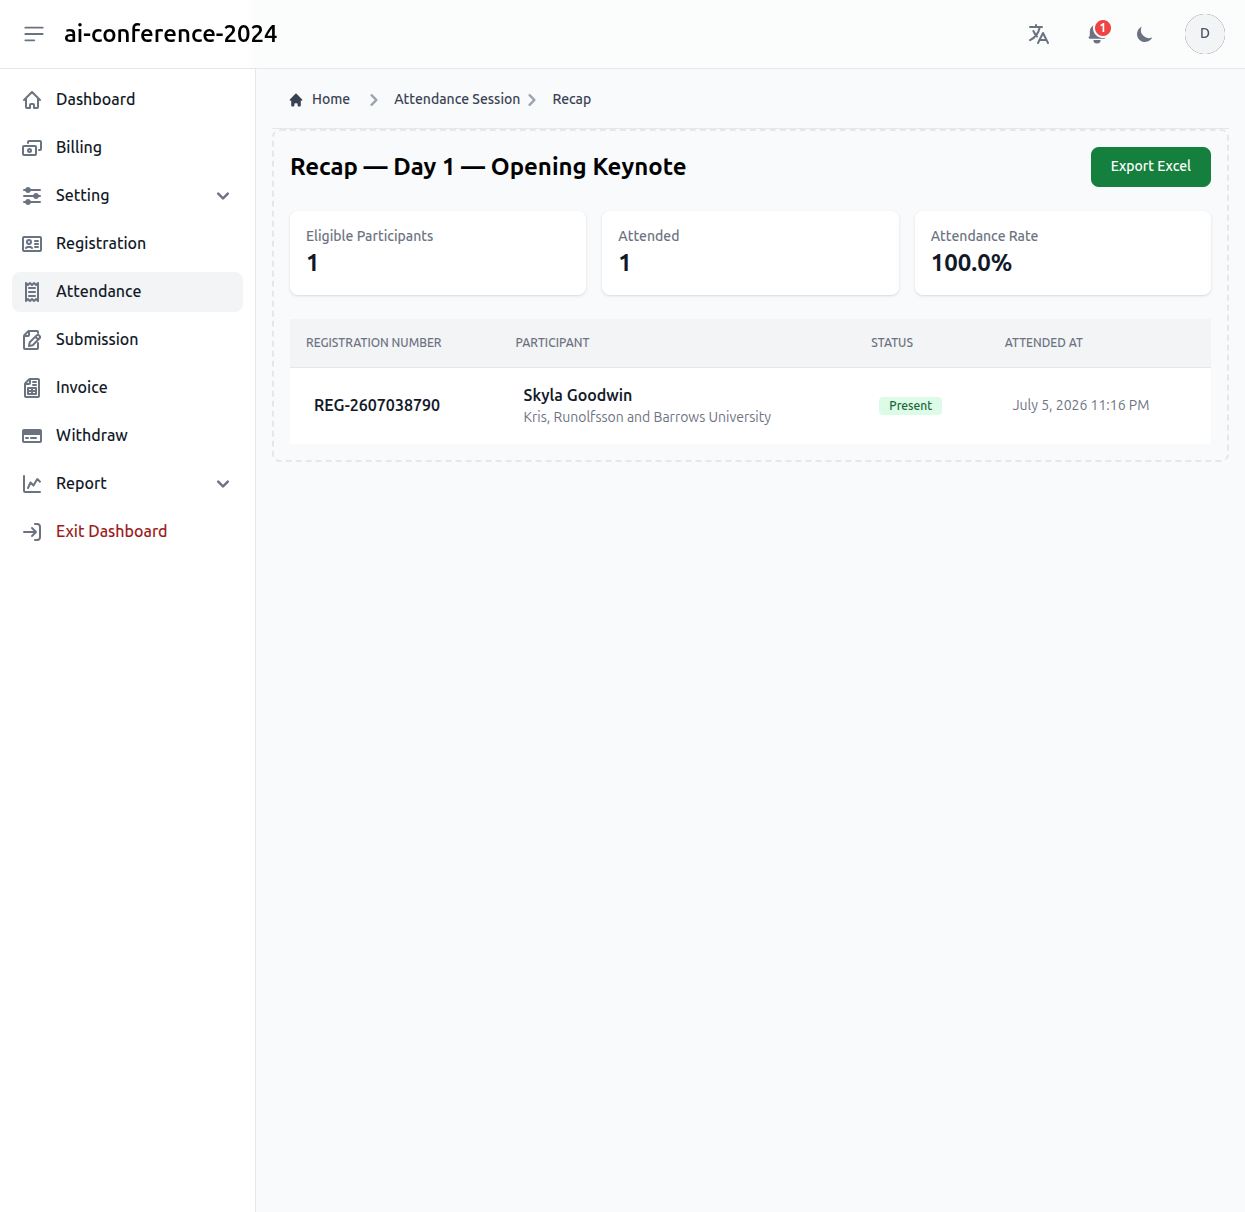
Screenshot: Recap with eligible/attended counts, attendance rate, and per-participant status
How participants check in
Participants open My Registrations → Attendance for their registration. Each open session shows a Check In button they tap once to record their attendance. Sessions that are closed, outside schedule, or not available to them display a status badge instead.
A registration must be verified before its owner can check in to any session. A participant can only check in once per session.
Need More Help?
Beyond these core tasks, your dashboard also includes reviewer criteria, registration file types, letters of acceptance, invoices, withdrawals, and reports. If you need help:
- Explore each sidebar section — most follow the same list, create, update, and delete pattern shown here
- Check your Billing section to understand plan limits for your conference
- Use the contact form on confspace.id for platform-related issues